5 posts tagged with "enterprise-readiness"

View All Tags

· 9 min read
Kiran K

In this article, you'll learn how add SAML SSO login to an Express.js app. You'll use SAML Jackson with Auth0 to authenticate users and protect routes.

You can also access the full code at the GitHub repository.

Let’s get started!

Prerequisites

To follow along with this article, you’ll need the following:

  • Node.js installed on your computer
  • Basic knowledge about Node.js and Express.js

Setting up the database

For our article, we’ll create a free Postgres database on Heroku instead of setting up a local Postgres server.

  • Go to Heroku signup page, then create an account.
  • Go to Apps and click Create new app.
  • Give your app a name, and click the Create app button.
  • Go to the Resources tab.
  • Choose the Heroku Postgres from the Add-ons search box, and click Submit Order Form.
  • Click the Heroku Postgres and select Settings tab.
  • Click the View Credentials button and copy URI.

Now you have created a free PostgreSQL database and copied the database connection URI. We'll need the connection URI later.

Configure the Identity Provider

We'll use the Auth0 as our identity provider. An Identity Provider (IdP) is a service that manage user accounts for your app.

  • First, go to the Auth0 signup page, then create an account.
  • Go to Dashboard > Applications > Applications.
  • Click the Create Application button.
  • Give your new application a name.
  • Choose Regular Web Applications as an application type and the click Create.
  • Go to the app you created, then click the Addons tab.
  • In the SAML2 Web App box, click the slider to enable the Addon.
  • Go to the Usage tab and download the Identity Provider Metadata.
  • Go to the Settings tab and make below changes.
  • Add http://localhost:3000/sso/acs as your Application Callback URL that receives the SAML response.
  • Paste the following JSON for Settings, then click Enable button.
{
"audience": "https://saml.boxyhq.com",
"mappings": {
"id": "http://schemas.xmlsoap.org/ws/2005/05/identity/claims/nameidentifier",
"email": "http://schemas.xmlsoap.org/ws/2005/05/identity/claims/emailaddress",
"firstName": "http://schemas.xmlsoap.org/ws/2005/05/identity/claims/givenname",
"lastName": "http://schemas.xmlsoap.org/ws/2005/05/identity/claims/surname"
}
}

audience is just an identifier to validate the SAML audience. More info.

Auth0 provides database connections to authenticate users with an email/username and password. These credentials are securely stored in the Auth0 user store.

Let's create one so that our users can register or login.

Now we've everything ready, let's move to the next step.

Getting started

Launch a terminal and clone the GitHub repo:

git clone https://github.com/devkiran/express-saml.git
cd express-saml

Now, install the dependencies:

npm install

Add the environment variables:

cp .env.example .env

Update the DATABASE_URL variable with your Heroku Postgres database connection URI.

Append ?sslmode=no-verify to your database connection URI otherwise Heroku won't allow you to link to the database. This is a Heroku specific configuration.

For example postgres://hcydrtasctfyth:fe001b264322d6cf794@ec2-1-2-3-4.compute-1.amazonaws.com:5432/demo?sslmode=no-verify

About the Express app

This is a simple express.js app created using express-generator. You can use any express.js app if you want.

Our express.js app has only 2 routes.

  • GET / render a home page
  • GET /dashboard render a dashboard

So, what's the plan? We'll add SAML SSO login (via Auth0) to our express.js app so that only authenticated users can access the /dashboard.

Install SAML Jackson

Run the following command to install the latest version of the SAML Jackson.

npm i --save @boxyhq/saml-jackson

Once you installed Jackson, let's initialize it.

Add the following code to the routes/index.js.

// routes/index.js

...

let apiController;
let oauthController;

const jacksonOptions = {
externalUrl: process.env.APP_URL,
samlAudience: process.env.SAML_AUDIENCE,
samlPath: '/sso/acs',
db: {
engine: 'sql',
type: 'postgres',
url: process.env.DATABASE_URL,
},
};

(async function init() {
const jackson = await require('@boxyhq/saml-jackson').controllers(jacksonOptions);

apiController = jackson.apiController;
oauthController = jackson.oauthController;
})();

Setting up Express.js routes

Add SAML Metadata

The first route you'll create is the GET /config one. This route will display a form with following fields:

  • Metadata: Enter the XML Metadata content you've downloaded from IdP.
  • Tenant: Jackson supports a multi-tenant architecture, this is a unique identifier you set from your side that relates back to your customer's tenant. This is normally an email, domain, an account id, or user-id.
  • Product: Jackson support multiple products, this is a unique identifier you set from your side that relates back to the product your customer is using.
// routes/index.js

router.get('/config', async (req, res) => {
res.render('config');
});

Add a view to display the form.

<!-- views/config.ejs -->

<!DOCTYPE html>
<html>
<head>
<title>SAML Config</title>
<link
rel="stylesheet"
href="https://maxcdn.bootstrapcdn.com/bootstrap/4.0.0/css/bootstrap.min.css"
crossorigin="anonymous"
/>
<link rel="stylesheet" href="/stylesheets/style.css" />
</head>
<body>
<h1>SAML Config</h1>
<p>Add SAML Metadata.</p>
<form action="/config" method="POST">
<div class="form-group">
<label for="tenant">Tenant</label>
<input
type="text"
name="tenant"
id="tenant"
class="form-control col-md-6"
required="required"
/>
</div>
<div class="form-group">
<label for="product">Product</label>
<input
type="text"
name="product"
id="product"
class="form-control col-md-6"
required="required"
/>
</div>
<div class="form-group">
<label for="rawMetadata">Metadata (Raw XML)</label>
<textarea
name="rawMetadata"
id="rawMetadata"
cols="30"
rows="10"
class="form-control col-md-6"
required="required"
></textarea>
</div>
<button type="submit" class="btn btn-primary">Submit</button>
</form>
</body>
</html>

Now let's add another route POST /config that will store the form data by calling the SAML Jackson config API.

This step is the equivalent of setting an OAuth 2.0 app and generating a client ID and client secret that will be used in the login flow.

// routes/index.js

router.post('/config', async (req, res, next) => {
const { rawMetadata, tenant, product } = req.body;

const defaultRedirectUrl = 'http://localhost:3000/sso/callback';
const redirectUrl = '["http://localhost:3000/*"]';

try {
await apiController.config({
rawMetadata,
tenant,
product,
defaultRedirectUrl,
redirectUrl,
});

res.redirect('/config');
} catch (err) {
next(err);
}
});

There are a few important things to note in the code above.

defaultRedirectUrl holds the redirect URL to use in the IdP login flow. Jackson will call this URL after completing an IdP login flow.

redirectUrl holds an array containing a list of allowed redirect URLs. Jackson will disallow any redirects that are not on this list.

Next, let's start the express app. The app starts a server and listens on port 3000 (by default) for connections.

npm start

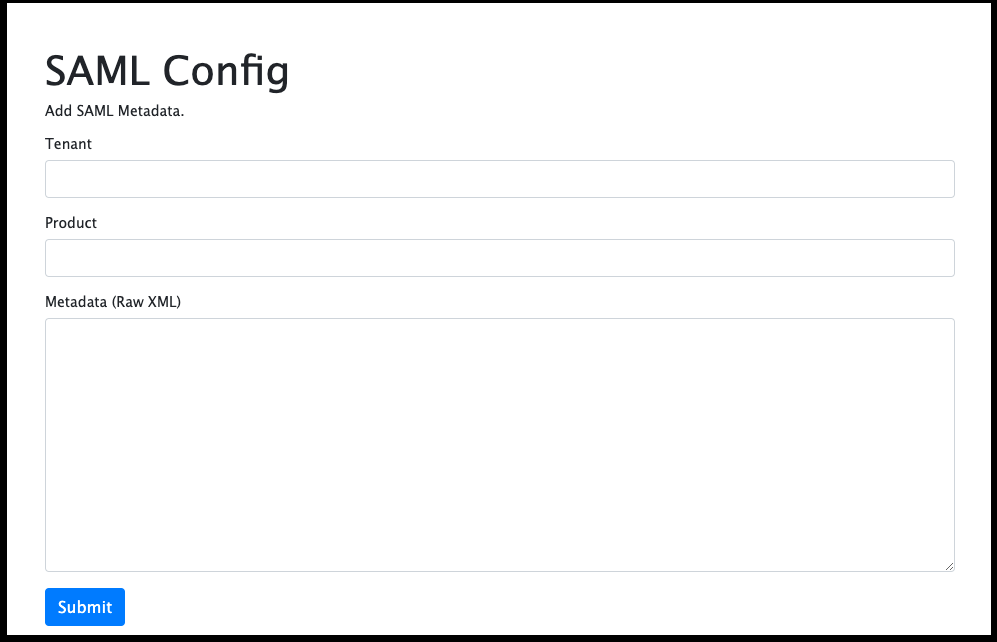
Now, let's visit http://localhost:3000/config, you should see the page with a form.
img alt

Here you can add the metadata you've downloaded from Auth0. Fill out the form with a Tenant, Product, and paste the metadata XML content as it is.

I'll use 'boxyhq.com' for tenant and 'crm' for product.

The response returns a JSON with client_id and client_secret that can be stored against your tenant and product for a more secure OAuth 2.0 flow.

If you do not want to store the client_id and client_secret you can alternatively use client_id=tenant=<tenantID>&product=<productID> and any arbitrary value for client_secret when setting up the OAuth 2.0 flow.

Redirect the users to IdP

Now you have added the SAML metadata, you'll need a route to redirect the users to IdP to start the SAML authentication.

Let's add a new route GET /sso/authorize.

Don't forget to change the values of the tenant and product in the code.

// routes/index.js

router.get('/sso/authorize', async (req, res, next) => {
try {
const tenant = 'boxyhq.com';
const product = 'crm';

const body = {
response_type: 'code',
client_id: `tenant=${tenant}&product=${product}`,
redirect_uri: 'http://localhost:3000/sso/callback',
state: 'a-random-state-value',
};

const { redirect_url } = await oauthController.authorize(body);

res.redirect(redirect_url);
} catch (err) {
next(err);
}
});

oauthController.authorize() will returns a redirect_url. You should redirect the users to this redirect_url to start the IdP authentication flow.

Handle the SAML Response from IdP

This route becomes the Assertion Consumer Service (ACS) URL of your app. The ACS URL tells your IdP where to POST its SAML Response after authenticating a user.

The SAML Response contains 2 fields: SAMLResponse and RelayState.

// routes/index.js

router.post('/sso/acs', async (req, res, next) => {
try {
const { SAMLResponse, RelayState } = req.body;

const body = {
SAMLResponse,
RelayState,
};

const { redirect_url } = await oauthController.samlResponse(body);

res.redirect(redirect_url);
} catch (err) {
next(err);
}
});

Call to the method oauthController.samlResponse() will returns a redirect_url. You should redirect the users to this redirect_url. The query parameters will include the code and state parameters.

Code exchange

Now exchange the code for a token. The token is required to access the user profile.

Let's create a new route GET /sso/callback to handle the callback.

// routes/index.js

router.get('/sso/callback', async (req, res, next) => {
const { code } = req.query;

const tenant = 'boxyhq.com';
const product = 'crm';

const body = {
code,
client_id: `tenant=${tenant}&product=${product}`,
client_secret: 'client_secret',
};

try {
// Get the access token
const { access_token } = await oauthController.token(body);

// Get the user information
const profile = await oauthController.userInfo(access_token);

// Add the profile to the express session
req.session.profile = profile;

res.redirect('/dashboard');
} catch (err) {
next(err);
}
});

In the above code, replace the value for tenant and product with yours.

Protect the dashboard

Now is the time to fix our GET /dashboard route so that only authenticated users can access it.

Let's fix it by adding a condition to check if the profile exists in the session.

If profile is undefined, redirect the users back to the / otherwise display the profile on the dashboard.

Replace the GET /dashboard route with the below code.

// routes/index.js

router.get('/dashboard', function (req, res, next) {
const { profile } = req.session;

if (profile === undefined) {
return res.redirect('/');
}

// Pass the profile to the view
res.render('dashboard', {
profile,
});
});

Replace the views/dashboard.ejs view with the below code.

<!-- views/dashboard.ejs -->

<!DOCTYPE html>
<html>
<head>
<title>Dashboard</title>
<link rel="stylesheet" href="/stylesheets/style.css" />
</head>
<body>
<h1>Dashboard</h1>
<p>Only authenticated users should access this page.</p>

<p>Id - <%= profile.id %></p>
<p>Email - <%= profile.email %></p>
</body>
</html>

From the command line, let's restart the express app then visit the authorize the URL http://localhost:3000/sso/authorize.

If you've configured everything okay, it should redirect you to the Auth0 authentication page, then click on the Sign up link and register there

If the authentication is successful, the app will redirect you to the dashboard and display the id, email of the user.

img alt

Conclusion

Congratulations, you should now have a functioning SAML SSO integrated with your express.js app using the SAML Jackson and Auth0.

References

To learn more about SAML Jackson, take a look at the following resources:

Your feedback and contributions are welcome!

· 3 min read
Utkarsh Mehta

One of our products, Hermes is an audit logs service. Currently, Hermes is in the prototype phase and uses a Go REST API server to ingest audit logs and send them to Loki.

We were trying out different databases, ingesters & tools to see which are best suited for Hermes and should be able to scale with high traffic without losing a single audit log & which can search through high amount data efficiently.

Title Image

We decided to benchmark different combinations of ingesters (Vector, Fluentd, Fluent-Bit, etc.) and storage & query tools (Mongodb, Clickhouse, Elasticsearch, etc.).

The first round of benchmarks will be lightweight and extensive benchmarks will follow later once we pick the right tools for Hermes.

Hardware Configuration

The following tests and benchmarks have been performed on a MacBook Pro (14-inch, 2021) with Apple M1 Pro and 16 GB RAM, the tools to be tested were dockerized with docker desktop running with 4 GB Memory, 4 CPUs & 1 GB Swap.

Fluent Bit is a super-fast, lightweight, highly scalable logging and metrics processor and forwarder. It is the preferred choice for cloud and containerized environments. Source: fluent-bit website Clickhouse is the fastest OLAP database on earth. ClickHouse works 100–1000x faster than traditional approaches. Companies like Uber, Cloudflare, Spotify, and eBay use Clickhouse. Source: Clickhouse website

So few pointers before we go ahead,

  1. Fluent-bit is fast at ingesting logs/data, processing them, and sending them to a destination.

  2. Clickhouse is efficient at handling and querying data.

  3. Fluent-bit does not support Clickhouse by default.

  4. The fluent-bit ecosystem lets users write their plugins in Golang and add additional support required.

  5. For faster querying in Clickhouse, an efficient table schema with indexes, compression, etc. should be established.

Clickhouse plugin for fluent-bit

I developed a fluent-bit output plugin for Clickhouse.

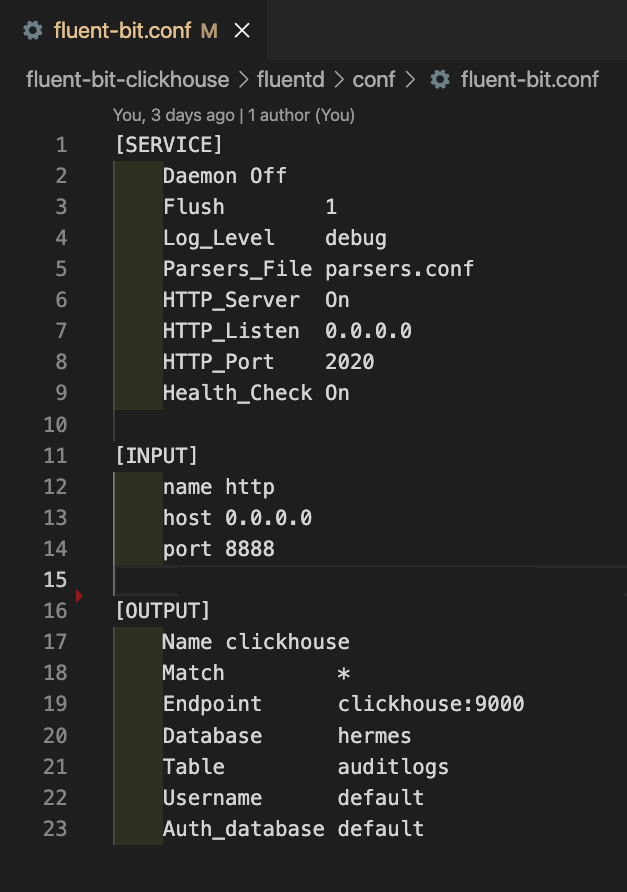
Fluent-Bit config

Fluent-bit Configuration

This config makes fluent-bit ingest data via HTTP server listening on port 8888 and sends the data to Clickhouse with configuration stated.

Clickhouse config

I ramped up the number of concurrent requests/queries by modifying the config.xml. After multiple tests, I finalized the following config.

Clickhouse Configuration

Load testing tool

I developed a load testing tool with Node.js that can be used to benchmark REST API-based endpoints of Fluent-bit.

API Benchmarking

Another tool to load test is the querying part of Clickhouse.

Clickhouse Load Testing

The results

These results are dependent on the ram allocated to the Docker engine, in my case, it's(4 GiBs).

Ingester

Ingester results

Query

Queryer result

Conclusion

Ingester

  1. Fluent-bit can handle loads up to 2000 req/sec but in the case of bigger batches, the speed goes down drastically. (200 X 10) & (300 X 10)

  2. In the case of long-term light batches, Fluent-bit performs consistently. (10 X 1000)

  3. Fluent-bit performs at average speeds in the case of average loads (50 X 50).

Query

  1. Clickhouse shows the best req/sec performance with an average load (50 X 50).

  2. Also, Clickhouse's performance was pretty satisfactory for all the different variations of records in DB. (1.1 mils, 50k, 25k, 10k, 2k & 1k).

  3. Clickhouse was able to manage short-term high loads and long-term light loads efficiently. (100 X 10) and (10 X 5000).

We will be posting more blogs regarding benchmarks, tools, etc., as we go on to build Hermes and many other dev tools. Please leave comments below.

Thank you!

· 7 min read
Sama - Carlos Samame

You have decided to quit your job and start something on your own, congratulations! Welcome to a new way of living, as our little green friend told us some years ago “do or do not, there is no try”. Resilience and perseverance will be your two new best friends now; we all know that starting a company is not hard at all, but something hard at the beginning of the journey is finding product-market fit, especially if you are selling to enterprises (if you are an open-source founder, make sure you prioritize project-community fit first).

img alt

Photo by Mulyadi on Unsplash

Having worked for companies like Amazon Web Services & O2-Telefónica connecting enterprises with startups around the world, there are some best practices that I would like to share. We just have to remember that enterprises are conformed by groups of people, and every person is different. So please, don’t expect the secret sauce or the “right way” to do it. Even though each case will be unique, always look for the patterns of what works best for your company. I like to use the process DIA (Discover – Imagine – Act) to overcome challenges, so let me take you through it.

Discover

First, you have to understand the problem that you are solving. Is it really a problem or are you just in love with a good idea? Asking many times “why” will help you understand the hidden problem (the real one), and it will allow you to understand the needs that the enterprise has. Once you understand the needs of the enterprise, it is time to focus on understanding the needs of your user and your buyer, most of the time these are two different stakeholders within the organization. Is the need of the user a priority for the buyer, or is it just a distraction? You will see that in some organizations they are aligned and in others, they cannot even stand each other; so you must take the time to understand the dynamics between these stakeholders, and the culture of the enterprise itself (how they make decisions).

Sales cycles are indeed long if you look at them from a startup’s point of view. Remember that this is the standard speed for enterprises. Startups speak AGILE and Enterprises speak SECURITY, and for many people, these two terms can’t go together (don’t worry, we are proving them wrong @BoxyHQ). Enterprises have got plenty of software they already depend on that needs to work with whatever your product can do for them. Their technology is usually old, I have seen many enterprises with Frankensteins, they think they need to create a third leg to run faster and they end up building unnecessary technologies that affect the quality and the speed of their solutions. You need to focus on the cost of the enterprise (time and resources) to integrate your solution, and to do that you have to make sure that the impact is big enough to be worth it.

To make sure the impact you are generating is relevant to the enterprises focus on a few potential customers, as Jason Lemkin mentions “Almost all big companies now have innovation departments of some sort, as do many divisions and groups. The general idea is to bring in 1–2 new vendors a year that don’t risk taking the core business down but could have a material impact on the bottom line. If you truly can change the way they do business, you can often get a meeting. I’ve done this in both my start-ups in the earliest days with 10+ F500 companies in the first 90 days.”

This Discovery stage is also perfect to understand what your solution needs to have to be compliant; security is key for them. Startups that are not compliant with the enterprises’ requirements could delay the sales cycle, or what is worse they could lose the deal.

Imagine

With all the information that you now have, it is time to visualize the future. Does your solution need some changes? Do you need new features to be compliant? Or could it be that maybe the enterprise doesn’t need all the features that you had in mind? Take some time to readjust your product as necessary, including how you are going to package it and how you are going to distribute it. Apply all the insights collected in the Discovery stage to test, measure, and iterate.

A common error that I have seen from startups is not focusing on selecting the right partners, and just moving forward with inbound opportunities. Some of them could be good but overall is a distraction to say yes to anyone that wants to resell your solution, you need to plan ahead.

Talking about planning, once you know who your internal sponsor is you need to facilitate the job for them. That is the person that will take your fights internally, so make sure you are giving them the right tools. If they see two concerns about integrating your solution, you should think of additional concerns and imagine how to mitigate each of them. You need to train your sponsor for unexpected scenarios that the decision committee will bring. Usually, enterprises ask for a “request for proposal” (RFP), the more you know about it, the better you will be prepared.

As an imagination exercise, I love Amazon’s Working Backwards process and the PRFAQ - you can learn more about it here. It is helpful to visualize the impact you aim to have and work backwards from your customer needs to create a solution. It is similar to the Design Thinking process, but the PRFAQ adds the manifestation piece.

Act

Now is the time to act! But be careful, another mistake that many startups make is not executing at the right time, they spend too much time thinking (doing research) or they reach out to enterprises before making sure they are ready, burning your bridges. Timing is going to be key for you.

They need to trust you and your solution, every contact point is an opportunity for them to trust you, so make sure to go to these meetings well prepared, doing the right questions but at the same time with some insights on the market, their competitors, technologies, etc. You should be an expert in your niche but at the same time, you should be smart enough to listen. The more you know about them, the better you can adapt your solution and at the same time influence them.

Make sure you have the right metrics for your success cases, it doesn’t matter if you were selling to SMEs before or if you already had a few Proof of Concepts (POCs) with enterprises. Large companies don’t want to feel they are a guinea pig, if you did a POC and you didn’t move forward afterward most executives will not see it as unsuccessful, period.

Be patient, agile enterprises could spend between 6 to 12 months in conversations before signing an agreement, but many could take years (I’ve seen one company spending 3+ years). While you are waiting, make sure you are at the top of their mind, always adding value, not asking for unnecessary coffees. Key people will resign, will get fired, will change roles, so make sure you find a way to navigate these transitions, you don’t want to start from scratch.

Each enterprise is a different world, and there are more things you will find out while spending time with them, but I hope you find this blog post insightful. If you have any comments or questions you would like to discuss, please feel free to reach out. We have free Enterprise-Ready office hours to help startups be compliant and accelerate their sales cycle with enterprises.

· 4 min read
Deepak Prabhakara

I recently had to revamp my home office setup and decided to make a trip to my closest IKEA. The wide range of choices of desks in Micke, Malm, Brusali, Alex, and Bekant was only the beginning of the journey. I knew I had to head back home with the desk, find a good place to unpack the unit, find my screwdrivers, hammer, alan keys, and finally dedicate a few hours of labor to assemble everything. I enjoy the process but it is not devoid of frustrations. In the end, I now have a desk I value more because of the labor I put into it.

img alt

This is the IKEA effect, a cognitive bias where we place a disproportionately high value on products that we have partially created. This makes people value things they had a part in building than the ones they didn’t. We face this challenge as developers every day, the classic build vs buy decisions when we build software. We’d love to build everything ourselves and in an ideal world this would be possible but we need to juggle business requirements, limited resources, and deadlines. The challenge is always in striking the right balance between building what is core to the business and finding ways to offload non-core tasks.

Just like how an IKEA desk is pretty useless if half-assembled, a feature we set out to build is pretty useless if we end up getting caught up in the implementation details and are unable to see it through. When we set out to build BoxyHQ we constantly heard about the challenges of enterprise readiness from startups. They have to support a range of compliance, security, and governance requirements from their enterprise customers and their developers end up spending 30-40% of their time bogged down in the details of implementation. These startups build teams to work on cool and exciting things that are core to their business but the reality is that non-core features start competing for attention. As a result these non-core features also end up being just good enough to check some boxes and never quite get as innovative as they can get.

We have seen software eat the world. This has led to more surface area for security exploits and leaks which in turn is driving a broader awareness of security topics in enterprises. Security has become the top priority for all companies now and is no longer seen as the sole responsibility of the CISO’s team. This means a shift-left trend in compliance and data security for developers and we are taking a new approach at BoxyHQ to solve this problem. BoxyHQ provides developers with non-core building blocks (described above) that integrate easily with their products. Simple self-hosted services and APIs that they can pull into their existing technology stack. Developers no longer have to worry about correctly implementing SAML login flows, building and scaling a robust audit logs service, or figuring out the best encryption technique to safeguard PII data.

BoxyHQ will build IKEA desks for all our customers so they don’t have to. Just sit at your pre-assembled desk and continue working on cool things that you set out to build in the first place.

PS: Announcing SAML Jackson (who doesn’t like a bit of Pulp Fiction), a SAML SSO service that works seamlessly as an OAuth 2.0 flow and abstracts away the tedious XML bits of the SAML protocol. Check out https://github.com/boxyhq/jackson and the demo at https://github.com/boxyhq/jackson-examples/tree/main/apps/next-client-auth. If SAML SSO is not relevant to you at this moment don’t forget to bookmark us and check back again. We are building a "DevSecMesh" over time so you can expect a lot of other exciting features over the next few months.

· 3 min read
Deepak Prabhakara

I love Lego (don't we all), probably a little more than my kids. It invokes a builder's instinct. I feel the same way with code as well. When I started my career in the early 2000s building software was complex. You had to visit datacenters and set up your servers to even get started, it was the age of the ASPs; the predecessor of SaaS.

img alt

Then came the Cloud; infrastructure at the click of a button. Nothing short of magic! And then over the last decade or so the Cloud enabled a lot of the re-usable services to be packaged up as APIs; enter the API Economy. If you need audio or video in your app, dial the Twilio API. If you need payments, cash in on the Stripe API. If you need authentication, sign in to the Auth0 API. The list is endless (also I ran out of puns).

Coding today is like assembling lego blocks thanks to these APIs and developers love it. There is no need to re-invent these blocks in every startup, it’s much better to outsource the non-core stuff.

I have spent a significant part of my career building products that were sold to the Enterprise. I have helped build out numerous Compliance and Security features, all essential to make the sale but still a big distraction from the core product. I have personally experienced the pain of balancing these Enterprise features with other core features. My co-founder Sama has spent a significant part of his career helping startups accelerate and connecting them to Enterprises. He has seen the pain of startups not being ready to sell to the Enterprise despite having fantastic products.

We both looked at all this and questioned ourselves: What if Enterprise Readiness had an API? What would that look like? How would it work? Could we create a product that will help developers at startups address the hard problems of enterprise readiness, data security, and compliance?

And we went ahead and started BoxyHQ to build this vision. BoxyHQ is a commercial open source software that helps you add enterprise features to your app in just a few lines of code. We want to make enterprise features simple, that's it. That's our focus for the next few years. We want to solve the hard things for you and give you back valuable time to focus on your core products.

If you are selling to the Enterprise, come and say hello. We'd love to give you early access and help you with other aspects of Enterprise sales as well.

"Enterprise sales is fun!" - said no one ever